7 - Pushbutton Start
We made it to Boulder, Colorado about a day and a half before the competition. After unpacking, we did a few checks with the rover to make sure it survived the flight in our carry-on luggage. Everything checked out OK; nothing was damaged.
Just to be absolutely sure we were ready, we took another look at the competition rules. As it turned out, we forgot something. See the highlighted text below.
Just to be absolutely sure we were ready, we took another look at the competition rules. As it turned out, we forgot something. See the highlighted text below.

All this time we were using the transmitter to flip between Auto Mode and Manual Mode. But we couldn't use this during competition. We needed to find a way to integrate a button or a switch on the rover itself. Ideally, we would turn the rover on and it would be in Manual Mode. Then once we got to the starting line we could push a button, Bebop would switch into Auto Mode, and then it would begin the mission.
Thankfully, we had a spare Arduino Uno (as a backup for Rocksteady). All we needed to do was write a simple program to reproduce PWM signals (similar to what the transmitter sent to the APM), and have it toggle between the two modes using a button of some sort. Our button of choice: the mini push on/off switch from a local Radio Shack. It's a single-pole double throw (SPDT) switch with a satisfying click.
A big thanks to Chris from Class 5 Society for letting us use his workshop while we cobbled together a solution. You might remember his robot from previous SparkFun AVCs - the one with the man-sized skeleton riding in it. We used some of his tools to retrofit our robot.
Our updated connection diagram is below.
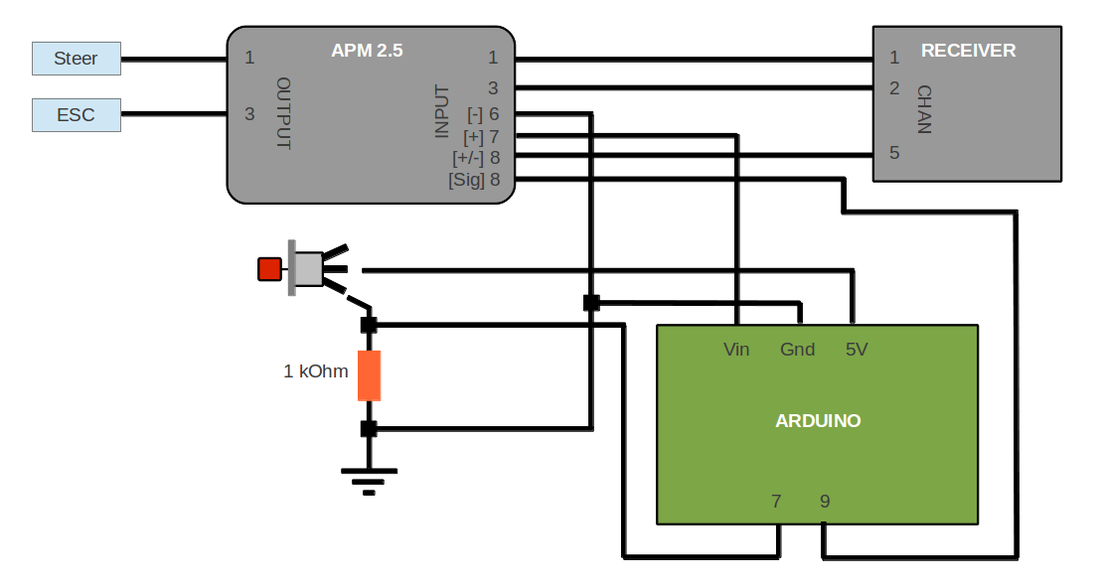
As you can see above, there were a few minor changes.
The receiver remained mostly the same. We moved the connection between the CH5 signal lead and the APM Input Port 8 signal lead. This port was rerouted to Arduino Pin 9 - a PWM compatible pin. Pin 9 was used to output the two PWM signals that toggled between Auto and Manual Modes. The Arduino received its power from the APM, and we completed the circuit by making sure the two devices shared the same ground terminal.
The pushbutton switch just needed a 1 kOhm resistor on one end and 5 volts on its Common terminal (the one in the middle). The voltage difference between the two pushbutton states was monitored by Arduino Pin 7.
Here's the hastily-written program we loaded onto the Arduino.
| bebop-pushbutton.ino |
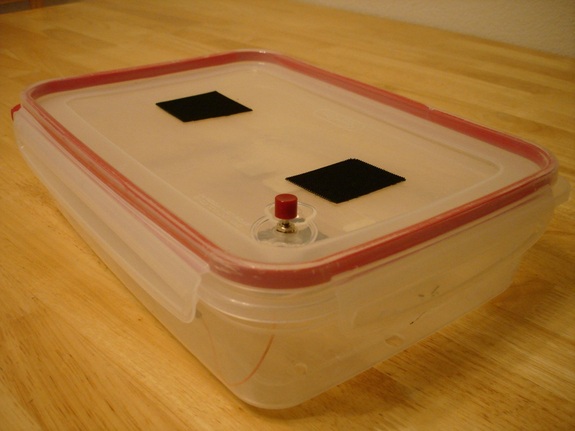
The electronics housing easily accepted the additional electronics. In fact, mounting the pushbutton switch couldn't have been easier. There was a vent hole on the lid that fit our switch perfectly. As I said before, the plastic container is the best $7 you will spend on a robot!
Last Update: 5 January 2014